
Contents [Show]
By saving the changes, you have successfully allocated additional RAM to Minecraft for the selected profile. From now on, Minecraft will utilize the allocated RAM whenever you launch the game with that particular profile.
Alternative Methods:
To the above method using the Minecraft Launcher, there are a few alternative approaches you can take to allocate more RAM to Minecraft. Let's explore these methods as well:
Using the Twitch App:
- Download and install the Twitch App on your computer.
- Open the app and navigate to the "Mods" section.
- Look for Minecraft in the list of available games and click on it.
- Select the profile for which you want to allocate more RAM on the Minecraft tab.
- Under the profile settings, you'll find an option to allocate RAM.
- Adjust the allocated RAM to your desired amount and save the changes.
Using the MultiMC Launcher:
- Download and install the MultiMC Launcher on your computer.
- Launch the MultiMC Launcher and create a new instance for Minecraft.
- Right-click on the created instance and select "Edit Instance."
- In the settings window, go to the "Version" tab.
- Check the "Memory" box and adjust the allocated RAM as needed.
- Save the changes and launch Minecraft using the MultiMC Launcher.
Editing the Minecraft Launcher Profile:
- Open the Minecraft Launcher on your computer.
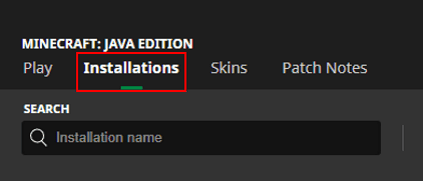
- In the Launcher, click on the "Installations" tab.
- Locate the profile you want to modify and click on the three dots (...) next to it.
- Select "Edit" to open the profile settings.
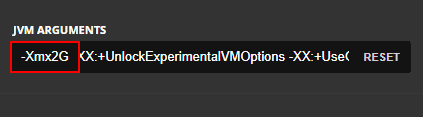
- Scroll down to find the "JVM Arguments" field.
- Modify the argument related to RAM allocation, such as "-Xmx2G" for 2GB of RAM.
- Save the changes and launch Minecraft using the modified profile.
Using a Command Line or Batch File:
- Open a text editor (such as Notepad) and create a new file.
- Type the following command line: java -Xmx4G -Xms4G -jar minecraft.jar
- Replace the "4G" with your desired amount of allocated RAM, such as "8G" for 8GB.
- Save the file with a .bat extension (e.g., allocate_ram.bat).
- Run the .bat file to launch Minecraft with the specified RAM allocation.
Is Minecraft becoming a bit of a bummer for you lately? Are you experiencing lag, slow gameplay, or other performance issues? Well, Don’t worry! A simple solution can potentially breathe new life into your Minecraft experience—allocating more RAM to the game. Increasing the amount of memory dedicated to Minecraft can significantly improve its performance and enjoy a smoother, more enjoyable gaming session.
In this guide, we'll walk you through how to allocate more ram to Minecraft, providing clear and straightforward instructions for different methods.
Ways to allocate more ram to Minecraft
Step 1: Determining Available RAM
Before you begin, you must know how much RAM your computer has installed. This information will help you allocate an appropriate amount of memory to Minecraft. To find out the amount of RAM available on your computer, follow these steps:
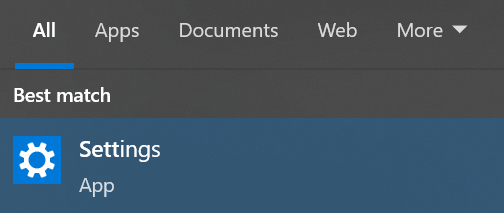
1. Right-click the Windows Start button and select "Settings" from the context menu.
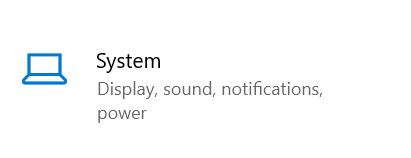
2. In the Settings window, choose "System."
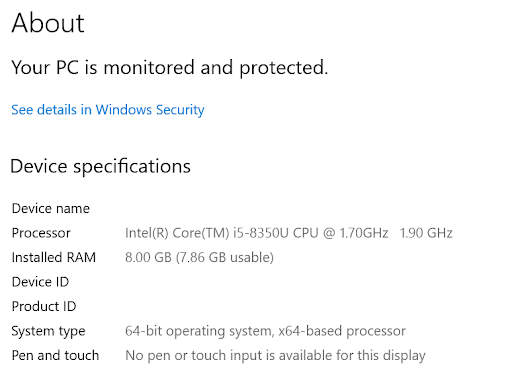
3. Navigate to the "About" section and look for the installed RAM under "Device specs."
Once you have determined the amount of available RAM, you can proceed to the next step.
Step 2: Enabling JVM Arguments
In order to allocate more RAM to Minecraft, you need to enable the JVM (Java Virtual Machine) arguments feature in the Minecraft Launcher. Here's how you can do it:
1. Double-click the Minecraft icon on your computer to launch the Minecraft Launcher.
2. In the Minecraft Launcher, go to the "Launch Options" tab.
3. Make sure that the Advanced settings are enabled.
4. Choose the profile for which you want to change the RAM allocation.
5. Check if the JVM arguments are already enabled.
Enabling JVM arguments allows you to modify the amount of RAM allocated to Minecraft. If they are already enabled, you can proceed to the next step. If not, follow the instructions provided to enable them.
Step 3: Modifying RAM for Minecraft
Now that you have enabled the JVM arguments feature, it's time to allocate more RAM to Minecraft. Follow these steps:
1. In the JVM arguments field, you will typically find something like "-Xmx1G."
2. Change the number after "-Xmx" to the amount of gigabytes (GB) of RAM you want to allocate to Minecraft. For example, if you want to allocate 4GB, change it to "-Xmx4G."
3. After making the necessary changes, click the "Save" option to save the modifications.
What does allocating more RAM to a game do?
Allocating more RAM to a game like Minecraft can significantly enhance your gaming experience. By increasing the amount of RAM dedicated to the game, you provide it with additional memory resources to handle complex tasks and load larger worlds seamlessly. With more RAM, Minecraft can render graphics faster, reduce lag, and prevent crashes caused by insufficient memory.
Similarly, allocating more RAM to Steam games can improve performance, allowing for smoother gameplay and faster loading times. It enables the game to store more data in memory, resulting in improved responsiveness and reduced stuttering. Whether it's Minecraft or Steam games, allocating more RAM can unlock the full potential of your gaming experience, delivering enhanced visuals, improved stability, and overall smoother and more enjoyable gameplay.
Benefits of Allocating More RAM:
- Improved performance and reduced lag
- Handling larger worlds seamlessly
- Minimized crashes due to insufficient memory
- Faster loading times for quicker gameplay
How much ram should I allocate to Minecraft if I’ve 16 gigs?
If your computer has 16GB of RAM, you can allocate around 4GB to 8GB of RAM for Minecraft. Allocating 4GB should be enough for most players, allowing the game to run smoothly without using all available system resources. However, if you want to use extensive mods or resource packs, allocating 8GB might give you a better experience with faster loading times and less lag. It's essential to balance allocating enough RAM to improve gameplay performance and leaving enough RAM for other background processes to ensure overall system stability.
Should I Allocate More RAM to Minecraft?
Allocating more RAM to Minecraft can significantly improve its performance, especially if you are experiencing lag or slow loading times. By default, Minecraft only uses a small portion of your available RAM, which might not be enough for smoother gameplay, especially when using resource-heavy mods or playing on larger servers. Increasing the allocated RAM can help the game run more smoothly and reduce lag, making for a more enjoyable gaming experience.
Is 32GB RAM Too Much for Minecraft?
Yes, allocating 32GB of RAM to Minecraft would likely be excessive and unnecessary. Minecraft only requires at least 4GB of RAM to run optimally. Allocating more RAM than the game needs can lead to diminishing returns and may not improve performance. It's best to allocate a reasonable amount of RAM, such as 4GB to 8GB, and reserve the remaining memory for other applications and background processes.
How to Use 16GB of RAM in Minecraft?
If your computer has 16GB of RAM, allocating a portion to Minecraft can enhance its performance. Here's how to do it:
- Step 1: Launch the Minecraft Launcher
- Step 2: Click on the "Installations" tab
- Step 3: Create a new installation profile or edit an existing one
- Step 4: In the "More Options" section, locate the "JVM Arguments" box
- Step 5: Adjust the "-Xmx" argument to set the desired amount of RAM (e.g., "-Xmx8G" for 8GB)
- Step 6: Save the profile and launch Minecraft with the allocated RAM.
Remember not to allocate all 16GB of RAM to Minecraft, which could hinder other applications and lead to system instability. Allocate reasonably while leaving enough RAM for your operating system and other background processes.
Does More RAM Increase FPS in Minecraft?
In general, allocating more RAM to Minecraft may not directly increase the game's FPS (frames per second). Minecraft's performance is heavily influenced by the CPU and GPU, which handle rendering and processing tasks. While increasing RAM can help the game load and handle assets more efficiently, it won't substantially impact FPS if your CPU and GPU are the bottlenecks.
If you experience low FPS in Minecraft, consider optimising your graphics settings, updating drivers, or upgrading your CPU and GPU for better performance. Allocating an appropriate amount of RAM is crucial for overall smooth gameplay, but other factors will boost FPS.
Wrap up!
Remember, when allocating more RAM to Minecraft, it's important to strike a balance and allocate an appropriate amount that suits your computer's capabilities. Allocating too much RAM can have adverse effects on your system's performance. It's recommended to allocate enough RAM to support your gameplay requirements without overburdening your computer.
By following the steps outlined above, whether through the Minecraft Launcher, Twitch App, MultiMC Launcher, or using command line/batch files, you can easily adjust the amount of RAM allocated to Minecraft. With the right amount of allocated RAM, you can enjoy smoother gameplay, reduced lag, and an overall enhanced Minecraft experience. Happy gaming!
About author

Techies Classic
The above article is written by team techies Classic. We do in-depth research to provide our readers with the value to choose things easier. To read more amazing tech content
0 Comments